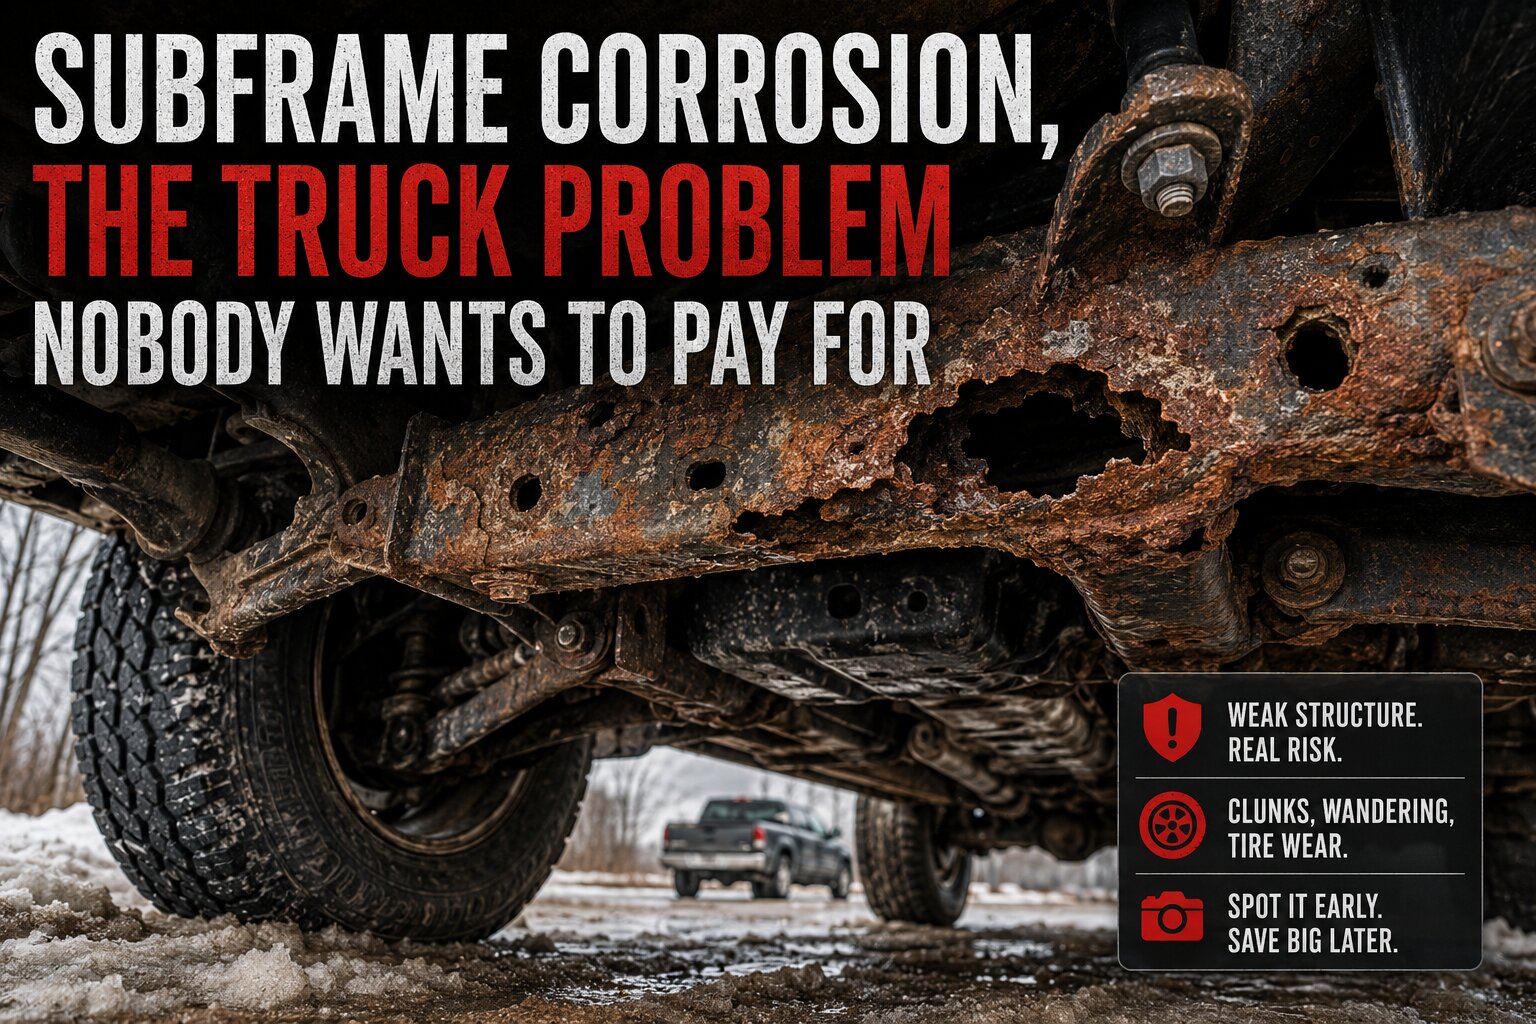
Subframe corrosion, the truck problem nobody wants to pay for
If you live where winter means road salt, brine, and gritty slush packed into every seam, subframe corrosion is not some rare “old beater” issue. It can show up on daily driven pickups and SUVs that still look decent up top. The subframe (and full frame on body on frame trucks) is the backbone that holds suspension mounting points in the right place. When rust starts eating structure instead of just surface scale, you can get clunks, wandering alignment, odd tire wear, and a general feeling that the truck is getting loose underneath you.
This guide is written for real U.S. use cases: towing a small camper, hauling firewood, running forest roads, beach driving, or commuting through salted winters. The goal is to help you spot warning signs early, understand what road salt attacks first, and show up to a shop with useful photos without doing something unsafe like stabbing at rust with a screwdriver.
Verified basics: what “subframe” means on common trucks and SUVs
Terminology matters because different vehicles rust in different places.
Body on frame pickups and many truck based SUVs (think Ford F 150, Chevy Silverado 1500, Ram 1500, Toyota Tacoma and Tundra, 4Runner) use a full ladder frame. People still call certain sections “subframes,” but the key idea is the same: the structure where control arms, steering rack, differential mounts, and crossmembers bolt on.
Unibody crossovers and some SUVs (many mid size family SUVs) use front and sometimes rear subframes bolted to the body. Those subframes carry the suspension and drivetrain mounts. If they rot badly enough, alignment can drift because the mounting points are literally moving.
Competitors and context: This isn’t brand specific. Salt belt corrosion hits Ford, GM, Ram, Toyota, Nissan, Jeep, Honda, Subaru, you name it. Some models have had well publicized frame corrosion histories over the years (especially in older vehicles), but exact model year specifics vary and are not something you should assume without checking service history and recalls for your VIN.
What road salt attacks first (and why it gets ugly fast)
Salt itself is not magic acid. The problem is that salt water is a great electrolyte. It speeds up electrochemical corrosion and it stays wet longer than plain water. Modern liquid brine also creeps into seams like it was designed for it, because it basically is.
On trucks and off road rigs, salt tends to start trouble in predictable spots:
1) Seams and boxed sections that trap moisture. Boxed frame rails and layered brackets can hold salty mud inside. You might see a frame rail look “fine” on the outside while scaling from within. Drain holes help but they also let salty slurry in.
2) Welds and heat affected zones. Weld areas can lose protective coating during manufacturing or later repairs. Rust often blooms at weld toes first.
3) Suspension mounting points. Control arm brackets, leaf spring hangers, shock mounts, sway bar mounts. These see stress cycles. Corrosion plus stress is a bad combo because thinning metal cracks easier.
4) Crossmembers. Especially ones that catch slush like a shelf or sit behind skid plates where debris packs in. A crossmember that looks like flaky pastry is not just cosmetic if it ties suspension loads together.
5) Hardware interfaces. Bolts through sleeves and bushings seize. You might go in for an alignment or a lift kit and find out cam bolts will not turn without heat or cutting. That’s not structural failure yet, but it’s an early sign your undercarriage has been living hard.
Surface rust vs structural rust: where it becomes a real safety issue
A little orange on bare steel parts is normal in many climates. Surface rust looks like discoloration or light scale that you can brush off to solid metal underneath. Structural corrosion is different: it reduces thickness and strength of the part.
Here are practical red flags that move it from “ugly” to “needs real attention”:
Flaking layers you can peel by hand or that fall off in chunks when you tap lightly with something non sharp (like the handle of a screwdriver). Thick delamination means metal has been converting to rust for a long time.
Swollen seams. If a boxed section or bracket seam looks puffed up or split open, rust expansion may be forcing layers apart.
Holes or soft spots. Any perforation in a structural bracket or frame rail near suspension mounts matters. A hole in a thin splash shield is one thing; a hole near a control arm mount is another world.
Cracks near mounts. Rust plus flexing can lead to cracks around bolt holes or welds at suspension pick up points.
Misalignment evidence. If an alignment shop says they cannot get camber or caster into spec because adjustment range is gone or because parts are shifting under load, that can point to bent parts or rust weakened mounts. It does not automatically mean the subframe is failing, but it raises the stakes.
The symptoms drivers actually notice: clunks and alignment drift
You usually feel subframe related corrosion before you see the worst of it. Not always, but often enough that symptoms deserve respect.
Clunks over bumps: A single clunk when one wheel hits a pothole can be worn sway bar links or shocks. A deeper thud that seems to come from under your feet can be control arm bushing movement or a mount shifting on compromised metal. If the sound changes when you load the truck (bed full of mulch) versus empty, pay attention.
Alignment drift: You get an alignment and two weeks later the steering wheel is off again. Or it pulls under braking then straightens out. Sometimes this is tires or brake issues. But if mounting points are moving because brackets are rotting or bolts are loose in thinned metal, alignment will not stay put.
Tire wear that makes no sense: Inside edge wear on front tires can be camber related; feathering can be toe related. If you keep correcting alignment but wear returns quickly, something may be flexing or slipping under load.
Steering feel changes: Vague on center feel, more correction needed on the highway, or a twitchy response over expansion joints can come from worn components. Corrosion at steering rack mounts or subframe mounting points can add another layer of slop.
Towing instability: A half ton pickup towing within its rated capacity should still track predictably if everything is healthy. If you suddenly feel more sway sensitivity or “rear steer” over bumps (the truck feels like it steps sideways), do not blame only the trailer right away. Rear suspension mounts and crossmembers matter here.
A quick driveway check (safe version) before you book a shop visit
You do not need to be a fabricator to do an initial check. You do need to be safe about it.
Start with how it sits. Park on level ground. Look at ride height side to side; big differences can be springs but also broken mounts in extreme cases.
Look behind the wheels with a flashlight. Front lower control arm rear mounts are often visible from behind the front tire area on many trucks and SUVs. Rear leaf spring hangers (on leaf spring trucks) are another common sightline.
Check for fresh rust dust. Reddish powder around brackets after driving can indicate active flaking at contact points.
Listen during slow maneuvers. Turn lock to lock in a parking lot at low speed with windows down. Then drive slowly over an angled driveway entrance so one wheel loads at a time. Note any repeatable clunks tied to suspension articulation.
If you jack up the vehicle: use proper jack stands on solid ground and follow factory lift point guidance for your vehicle. If you are unsure, skip this part and let a shop put it on a lift.
Why poking metal aggressively is a bad idea (even if you want answers)
I get it. You see crusty metal and your first instinct is to stab it with a screwdriver until something gives. That approach creates problems:
You can injure yourself. Rust flakes are sharp; falling debris gets in eyes fast; tools slip when they hit layered scale.
You can make damage look worse than it was. If metal was thin but intact, aggressive poking can puncture it and turn an inspection into an immediate failure point.
You change what the shop sees. A technician needs to assess existing condition without wondering what was caused by DIY probing five minutes earlier.
If you want one simple test without being destructive: use light taps with something blunt (handle end of a tool) on non critical areas just to hear if it sounds solid versus crunchy hollow scale. But do not go hammering near suspension mounts at home.
The photo checklist: what to capture before you head to a shop
A good set of photos saves time and helps you get clearer estimates because the shop knows where to focus right away. Use your phone flashlight and shoot both wide context shots and close ups.
1) Wide underside shots front to back: One from each side if possible so mounting locations are obvious.
2) Suspension pick up points: Front lower control arm mounts (front and rear), rear control arm mounts if applicable (coil spring setups), leaf spring hangers and shackles on leaf spring trucks.
3) Crossmembers: Especially ones near transmission support areas or rear suspension links. Get an angle that shows thickness and any swelling seams.
4) Subframe or frame attachment points: On unibody vehicles this means where the subframe bolts into the body rails; on body on frame trucks focus on areas where major brackets tie into rails.
5) Brake lines and fuel lines routing nearby: These are not “subframe,” but shops will often flag them while they are under there because corrosion likes lines too. If lines look heavily crusted near rusty brackets, include them so there are no surprises later.
6) Tire wear evidence: Take photos of tread across the width of each tire plus any unusual cupping or inside edge wear.
If your truck sees trails: skid plates can hide problems
Overlanding gear helps until it traps mud. Skid plates, rock sliders tied into frame rails, aftermarket bumpers with additional brackets; all of that can create pockets where wet debris sits against steel for months.
If you run skid plates year round in salty states, periodic removal for cleaning is annoying but effective prevention. Even once per year after winter can make a difference depending on how much brine your roads use.
The shop conversation: what to ask so you get useful answers
You do not need to tell a technician how to do their job; just aim them at your concerns:
Ask whether corrosion is cosmetic or structural, specifically at suspension mounting points and crossmembers that carry load.
Ask what repairs look like in plain language: Is this cleaning plus coating? Replacing a bolt on bracket? Replacing an entire subframe? Welding patches? Some shops will not weld frames due to liability; others have certified welders for certain repairs depending on vehicle type and local regulations.
Ask about alignment adjustability: Can they loosen cam bolts? Are eccentrics seized? If adjusters are frozen now, plan for extra labor later even if structure is still okay today.
If you tow or haul regularly, say so up front. Loads matter because compromised structure has less margin when you hook up a trailer or throw 1,000 pounds in the bed (payload varies widely by model and trim; check your door jamb sticker).
Ownership tradeoffs: when it’s worth fixing vs walking away
This part gets personal fast because budgets are real. Minor corrosion mitigation early is usually worth doing if the truck otherwise fits your life: maybe it has the right bed length for lumber runs or 4WD with low range for muddy access roads (on many traditional 4x4 trucks). But once structural corrosion reaches key mounting points, costs rise quickly because labor dominates and parts may be large assemblies like subframes or major brackets.
If you’re shopping used in salt states: prioritize underside condition over shiny paint correction every time. A clean interior does not help if alignment cannot be held because structure is compromised underneath.
Prevention that actually works in salted climates (without pretending rust stops forever)
No coating makes steel immortal, especially if you keep driving through brine every winter. But you can slow corrosion dramatically:
Rinse strategically: A basic underbody rinse after big storms helps more than people think. Focus around wheel wells where slush blasts onto mounts and crossmembers.
Clear packed mud: After trail runs in wet conditions followed by freezing temps, mud becomes salt holding concrete inside skid plates and brackets if you drive winter roads afterward.
Inspect seasonally: Late winter or early spring is when damage shows itself because everything has been marinating for months.
Be realistic about add ons: Accessories bolted into frame rails can trap moisture at contact surfaces unless installed carefully with appropriate protection steps recommended by manufacturers (procedures vary).
The bottom line: treat clunks plus rust as data, not drama
A clunk by itself might be a sway bar link. Rust by itself might be surface scale on an axle tube. Put them together with alignment drift or weird tire wear though, and it’s time to look harder at subframe and frame structure before your next towing trip or long highway run.
If you take clear photos of key mounts and crossmembers, avoid aggressive poking at suspect metal, and tell your shop exactly what symptoms you’re feeling (when they happen and how repeatable they are), you’ll usually get better answers faster. And if the news isn’t great, at least you’ll be making decisions based on what’s happening under the truck instead of guessing from the driver’s seat.
0 comments
Join the discussion around this article.
Please login to comment.