That moment you realize you’re “the glare guy”
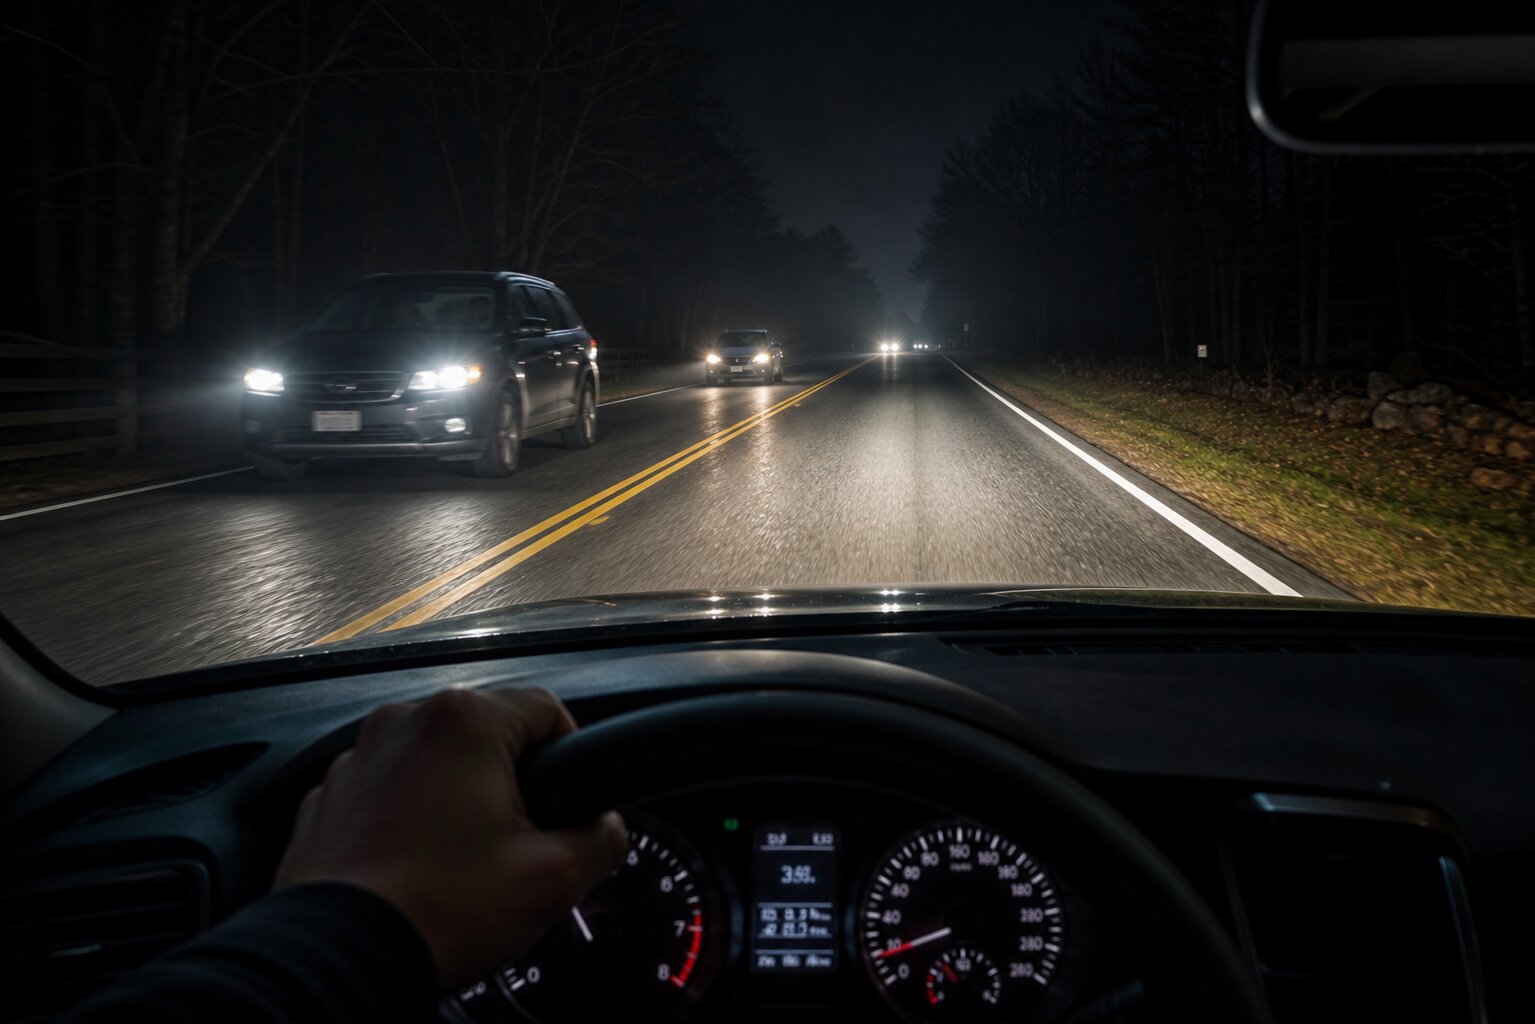
It usually hits on a dark two-lane when traffic is light and your mind is finally quiet. Then it happens: an oncoming car flashes you. Then another. And another. You glance down at the dash, half-annoyed, half-worried your high beams aren’t on… are they?
I’ve been there. Chicago nights, wet pavement reflecting everything like a mirror, and you’re just trying to get home while your low beams apparently look like stadium lights to everyone else. The good news: most of the time this isn’t a mystery electrical gremlin. It’s geometry. Headlight aim, ride height, load, and the type of bulb in the housing all stack up into one big “too high” problem.
Let’s walk through how glare happens, what you can check safely in your driveway, and when it’s worth paying a shop with the right aiming equipment to make it right.
Glare isn’t brightness it’s where the light goes
Here’s the key idea that gets lost in internet arguments: other drivers aren’t mad because your lights are “powerful.” They’re mad because your light is in their eyes.
Modern low beams are designed to throw a lot of light downrange while keeping a sharp cutoff below oncoming drivers’ sightline. That cutoff is created by optics either a projector lens with an internal shield or a reflector designed around a specific bulb filament position. When the aim is off by even a little, or when the bulb doesn’t sit exactly where the optics expect it, that cutoff lifts and glare goes everywhere.
The effect is worse than it used to be because lighting tech has improved. Many new vehicles ship with bright white LED low beams from the factory, and even when they’re aimed correctly they can look harsh compared with older halogen setups. Throw rain into the mix (hello, Lake Shore Drive), and all that blue-white light scatters off droplets and shiny pavement.
The usual suspects: aim, load, height, and “helpful” LED swaps
When people keep flashing you at night, I mentally run through four common causes.
1) Headlight aim is too high. This can happen from the factory (rare but not impossible), after collision repair, after suspension work, or simply over time if adjusters loosen or housings shift.
2) Your vehicle is pitched upward because of load or suspension changes. A bed full of mulch in a pickup or a trunk packed for a road trip squats the rear and points the nose up exactly like tilting a flashlight into someone’s face. Lift kits and leveling kits can do the same thing if headlight aim isn’t corrected afterward.
3) Housings are hazed or damaged. Oxidized lenses don’t just reduce light output; they scatter it. Scattered light is glare’s best friend.
4) Aftermarket bulbs (especially LED “conversion” bulbs) in halogen housings. This is the big one. A lot of LED replacement bulbs are marketed as plug-and-play upgrades for halogen reflector or projector housings. The problem is optical: many don’t replicate the exact position and size of a halogen filament. Even small differences can wreck the beam pattern creating bright hotspots above the cutoff that feel like high beams to oncoming traffic.
I’m not here to shame anyone who tried an LED swap. People want better visibility, and halogens can feel weak on unlit roads. But if your car wasn’t designed for that light source, you can end up seeing “more” while making everyone else miserable and that’s not a win.
A quick reality check: are your high beams actually on?
This sounds obvious until you’ve driven a newer vehicle with bright low beams and an auto high-beam system that’s eager to help.
Check your cluster indicator. Most cars show a blue icon for high beams. If it’s on when you think it shouldn’t be, figure out whether:
- The stalk is clicked forward (easy mistake after signaling).
- Auto high beams are enabled (often a separate button or menu setting).
- A camera-based auto system is struggling to detect other cars in heavy rain or around curves.
If people are flashing you only intermittently like right after crests or around bends auto high beams can be part of the story. Disable them for a night and see if the problem changes.
The driveway test I use: wall, tape, and five calm minutes
You don’t need fancy gear to spot an obviously bad aim job. You just need a level surface, a wall or garage door, and painter’s tape.
Before you start:
- Set tire pressures correctly. A few PSI off can change ride height more than you’d think.
- Remove unusual cargo. Aim checks should be done at normal driving load.
- If you tow or haul often, keep reading we’ll talk about that separately.
Basic method (general guidance):
1) Park facing a wall on level ground at a short distance (many people use around 25 feet; check your owner’s manual if it specifies something different).
2) Measure from the ground to the center of each headlight lens and mark those heights on the wall with tape (one mark per headlight).
3) Turn on low beams and look at the cutoff pattern. On many systems you’ll see a crisp horizontal cutoff with a step-up on one side (often toward the passenger side in left-hand-drive markets). The exact shape varies by design projectors vs reflectors and by market regulations, so don’t obsess over symmetry if your pattern has an intentional “kick.”
What you’re looking for:
- If both cutoffs sit above your taped headlight-center marks at that distance, odds are your lights are aimed too high.
- If one side is dramatically higher than the other, you may have an adjustment issue or something bent or loose.
If you open your hood and hear that faint plastic creak as you lean over the radiator support, you’ll often find simple adjusters near each housing (commonly one for vertical aim). Some cars make this easy; others bury adjusters behind trim. Use the correct tool so you don’t strip anything.
A note from my engineering brain: small turns matter because headlight aim is leverage over distance. A tiny change at the lamp becomes feet of change downroad. Go slow quarter turns not full rotations like you’re tightening lug nuts.
If it’s fine on flat ground but everyone still flashes you… look at pitch
This is where trucks and SUVs get blamed (sometimes fairly). The higher mounting height means even correctly aimed lights can feel intense to drivers in low sedans think Miata eye level versus full-size pickup headlight level. But repeated flashes usually mean more than “it’s tall.” It means pitch or aim is off.
Common pitch triggers:
- Heavy cargo behind the rear axle (pickup bed loads do this fast).
- Towing without proper setup (tongue weight squats the rear).
- Worn rear springs or sagging suspension components (older SUVs especially).
- Leveling kits/lifts installed without re-aiming headlights afterward.
If your vehicle has manual headlight leveling (a dial inside some cars sold outside the U.S., less common here), use it when loaded. Many U.S.-market vehicles don’t offer manual leveling; some higher-end models have automatic leveling, but it’s not universal across brands or trims.
Towing/hauling fix that actually works: set up your load correctly first then aim lights if needed. For towing, proper hitch setup matters more than cranking headlight adjusters down to compensate for a squatting rear end. If you tow frequently with an SUV or half-ton truck, consider equipment designed to keep the vehicle level (for example, weight-distribution hitches where appropriate). If you’re unsure what applies to your trailer and vehicle ratings, ask a reputable hitch shop don’t guess.
The LED swap trap: why “brighter” can be worse
I get why people do it. You install LED replacement bulbs in 20 minutes, flip them on, and your driveway lights up like Wrigley Field in April. Satisfaction… until oncoming traffic starts strobing their brights at you every night.
The technical problem is simple: a halogen housing is engineered around a halogen filament. The filament has a precise location relative to the reflector/projector optics. Many LED replacement bulbs use multiple diodes on flat boards, sometimes positioned differently than where that filament would be. Even if they claim “filament accurate,” tiny deviations change where light rays go after bouncing through reflectors and shields.
The result can be:
- A smeared cutoff (light above where it should stop)
- Hotspots that punch glare into mirrors
- Less useful distance vision despite higher apparent brightness (because stray light reduces contrast)
Legality note (important): In many places, putting an LED replacement bulb into a halogen headlamp assembly that wasn’t certified for it can be illegal for road use even if it physically fits. Regulations vary by jurisdiction; I’m not offering legal advice here, but I will say this: avoid mods that create glare or put you on shaky compliance ground. Better lighting shouldn’t come at everyone else’s expense or yours during inspection time.
If your headlights look cloudy, don’t ignore it
Lens oxidation sneaks up gradually one winter of salt spray and car washes at odd hours can do it and then one night you realize everything looks fuzzy. Cloudy lenses reduce output but also scatter light upward and sideways, which contributes to glare complaints even though you feel like you can barely see.
A proper restoration kit can help if the lens isn’t cracked or deeply pitted. The key is sealing afterward; otherwise oxidation comes back quickly. If moisture is inside the housing actual condensation droplets hanging out behind the lens that’s another issue: seals may be compromised, reflectors can degrade, and beam quality suffers.
Aim adjustments: what’s safe at home vs what belongs at a shop
I’m all for DIY when it’s careful DIY. But headlights are safety equipment; there’s no trophy for winging it.
You can usually handle at home:
- Verifying high beams aren’t accidentally enabled
- Checking tire pressure and removing unusual cargo before diagnosing
- Doing a basic wall test to spot obviously high aim
- Making small vertical adjustments if your owner’s manual explains how
You should strongly consider a shop when:
- One beam pattern looks distorted compared with the other (possible internal damage)
- The vehicle was recently in a front-end collision or had body work
- You installed new headlamp assemblies (even OEM) and want them set correctly
- Your car has advanced driver assistance features tied to cameras/sensors near headlamps (some calibrations are sensitive after repairs)
- You’re towing/hauling regularly and need advice beyond “aim them lower”
A good shop will use an optical aimer or dedicated aiming screen setup appropriate for your vehicle type. They’ll also know what “correct” looks like for different beam patterns especially with modern projectors where cutoffs are sharp enough to make small errors obvious.
Troubleshooting like an enthusiast: symptoms that point to specific causes
Here are patterns I’ve noticed over years of driving everything from low sports coupes to tall pickups in Midwest weather:
If people flash you mostly on hills/crests: Your aim might be borderline high already; cresting lifts your beam into eyes briefly. Lowering aim slightly or fixing rear squat often helps more than changing bulbs.
If people flash you constantly on flat roads: Aim too high or beam pattern problem (aftermarket bulbs/housing issues) is likely.
If only one side gets complaints: One lamp could be mis-aimed higher due to adjustment drift or damage; also possible wrong bulb seated incorrectly on one side.
If your lights seem bright but you still can’t see well: That often screams “glare + poor focus.” A sloppy beam throws light everywhere except where your eyes need contrast downroad edges, lane markings, hazards beyond your immediate foreground glow.
The fix that feels boring but works: go back to known-good parts
If you’re running LED replacement bulbs in halogen housings and getting flashed constantly, my practical advice is blunt: revert to quality halogen bulbs designed for your housing, then verify aim. It’s not as exciting as an LED swap video thumbnail promises, but it restores the beam pattern engineers designed around and usually stops the nightly flash-fest quickly.
If your vehicle came with factory LEDs and people still flash you after confirming proper load/tires/aim checks? Then it may be worth having aim verified professionally rather than chasing bulb changes that don’t apply to sealed OEM LED units anyway.
A Chicago-night sanity check: don’t ignore how conditions amplify glare
I’ll add one local observation from driving around here: wet roads make everything worse. Light bounces off glossy asphalt; dirty slush lines act like reflectors; salt film on windshields turns pinpoints into starbursts. Before you assume your car is solely at fault, clean both sides of your windshield thoroughly and wipe headlamp lenses too. It won’t fix bad aim but it reduces scatter that makes good aim look bad.
When flashing back isn’t the answer
If someone flashes you once, maybe they hit their stalk by accident. If it happens every drive, treat it like feedback not hostility.
The satisfying outcome is simple: correct aim, correct parts, correct load setup. When everything lines up, low beams illuminate far enough to drive confidently without painting every windshield ahead of you with glare. You’ll notice it immediately in how relaxed nighttime driving feels less tension in your shoulders, fewer angry blinks coming toward you, more usable contrast downroad instead of just raw brightness in front of the bumper.
If you want one checklist to start tonight
- Confirm high beams/auto high beams aren’t engaging unexpectedly
- Check tire pressures and remove heavy cargo before diagnosing
- Do a wall/cutoff check on level ground; look for obviously high cutoff
- Inspect lenses for haze/moisture; clean lenses and windshield thoroughly p- If running LED replacement bulbs in halogen housings and getting flashed: revert to quality halogens and re-check aim p- If collision/suspension/lift/tow setup is involved: schedule professional aiming/alignment advice
0 comments
Join the discussion around this article.
Please login to comment.